PuluTOF1 DevKit
the first tests and adaptation to ROS
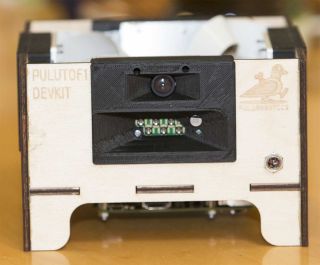
Pulurobotics from Finland decided to offer a new product: PuluTOF for Raspi with controller hat and four sensors. It is already working inside their robot Pulu M. The price for PuluTOF will be around the same as low-end LIDAR, less than 500 EUR with four sensors, but it gives you at 5Hz 3D point cloud instead of a single plane. Blog update: 9/8 ROS installed
I was looking what is new in the world of robotics and I came accross the
article
Pulurobotics:
ERF 2018 - Meeting the Gurus. The robots from Pulurobotics looks promising
here was another catch: Adapt PuluTOF to ROS and get your free development
kit!
It was hard to resist although I really do not like ROS, but … this is the
opportunity to try the latest 3D TOF sensor, which will be hopefully soon mass
produced.
I asked Miika Oja about it and this week I received a package from Finland.
He also sent me manual describing the sensor and how to start. As soon as
it will be available for download on Pulurobotics
website I will add direct link here. For now some copy and paste:
Features & specifications
- Sensor Technology: Real-time 3D Time-of-Flight
- Sensors: 4 modules 9600 pixels each, connected to the master board with flat flex cables
- Distance measurements: 160x60 pixels / sensor, total 28.4 kDistances / frame
- Instantaneous Field of View (FOV): 110°x46° / sensor
- Peak optical power: 8 W 850 nm NIR
- Minimum distance: 100 mm
- Maximum distance: typically 4-5 meters depending on external light and material reflectivity
- Accuracy & noise: Typically +/- 50 mm or +/- 5%
- Ambient light: works in direct sunlight with reduced accuracy and range
- 3-level HDR (High Dynamic Range) imaging
- Error detection and correction: Dealiasing, Interference removal, "Mid-lier" (flying pixel) removal, Temperature compensation, Offset calibration, Modulated stray light estimation & compensation, Producing fault-free point cloud, especially designed for mobile robot obstacle mapping
- 10 Frames Per Second (kit), 2.5 FPS (per sensor)
- Interface: SPI. Compatible w/ most single-board computers
- Raspberry Pi 3 compatibility: Specifically designed to work as a HAT (hardware attachment)
- Supplied example software saves .xyz point cloud files
- Most specifications can be extended within physical design limitations by modifying the stock firmware
Blog
20th July 2018 — The first real data
The package arrived on Tuesday, less than 1kg, nice box with 4 sensors and
power supply. My first recommendation is: do not turn it up-side down. I
did it and one of the TOF sensor slipped out of the wooden(?) box — but I was
probably not the first one, as this particular sensor number 3 was inserted
different way compared to all other sensors. The case of the sensor is 3D
printed and I believe that hole should be later mounting hole for a screw?
Why to look what is at the bottom? Well, there is the RaspberryPI3 with all the
connectors. I feel like total novice (correct wording would be ultra senior
who forgot everything) … RaspberryPI … that's the famous small computer
to which you can (or you should) plug monitor over HDMI, keyboard and mouse
over USB, Ethernet cable etc. I am "in the country" only with couple of
notebooks, and even my old WiFi router is left in one of
robots. What to do now??
Miika gave me hint: Ethernet has Raspi default, it means DHCP client, just
plug cable, boot and you got it in local network, what ever it is. … hmm,
my robo-friends were right: do you have client or server? DHCP is both, and
as I am pasting it here, Miika directly wrote that it is client. As I said
I do not have any router here so I plugged PULUTOF1 DEVKIT directly to my
notebook … so it was really talk of two clients … but they talked (actually
I was told that Windows has some mechanism to switch to DHCP server, so that's
what was probably happening). You could tell from blinking LEDs (at the end, I
also had some power issue, maybe mental blindness) and hints from internet that
you can use Wireshark to learn IP addresses of
all talking parties.
The good news was that you can see Raspberr_40:c3:95 … so it was talking
to me and I could see the IP address in dialog "Who has 192.168.43.1? Tell
169.254.78.166". I had to disable my alternative configuration fallback to
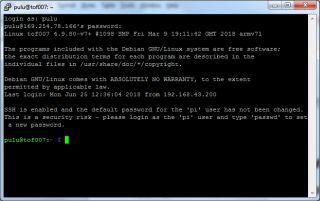
static IP, and it worked:
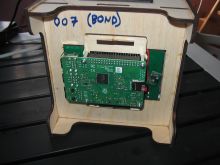
Note my 007 (BOND) edition
And belive it or not, exacly as manual described, all I need to do was
cd pulutof1-devkit
./main -p > pointcloud.xyz
to receive the very first data of my cluttered table:
134 -72 -46
134 -72 -46
160 -97 -61
107 -30 -21
101 -25 -18
102 -26 -18
107 -29 -21
146 -58 -43
230 -115 -88
…
… to be continued.
22nd July 2018 — Cloud points visualization
Tonight I did finally some "real" experiment. The good news is that DevKit
still has the same IP address as the last time, i.e. there was no problem to
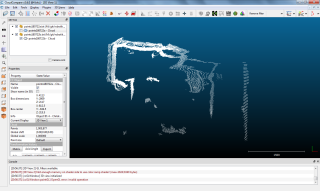
connect and collect more points. I used corner in kid's room, where the sensor
was perpendicular to the wall. One side was 37cm away, the other 66cm. The top
view of data collected over few seconds looked like this:
If you look at the raw data you could find values like this:
…
-778 0 0
…
0 458 0
…
so the reading are really in millimeters and they are corrected for the DevKit
box size (approximately 15cm x 15cm).
The source code is publicly
available at github so you can directly check
the
configuration structure. Note, that mountmode 4 is the same for all
four sensors, so my was really upside-down:
/* Sensor mount position 1: _ _ | | | | |L| |O|L| | |L| |_|_| (front view) Sensor mount position 2: _ _ | | | |L| | |L|O| |L| | |_|_| (front view) Sensor mount position 3:--— | L L L |--— | O |--— Sensor mount position 4:--— | O |--— | L L L |--— */
(ASCII art in
pulutof.c:206)
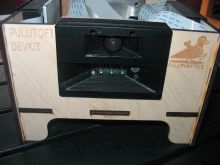
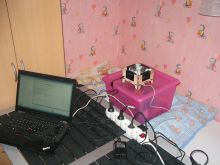
And here are also some pictures of the sensor and my „test environment”:
28th July 2018 — Bags in ROS
Today it will be a little bit off topic but not too far. I am going to talk
about Bags in ROS, which are basically
log files. How is this related to PuluTOF1 DevKit? Well, do you remember
Adapt PuluTOF to ROS task? The idea is that as the first step I will
create only log file which can be replayed via ROS tools. No need for ROS, no
need for real-time constrains. I can even share the log/bag with ROS fans to
check if they can run their favorite modules to get some reasonable output,
hopefully. We will see.
Yes, there is also another motivation. Two weeks ago we, together with
Technical University (ČVUT), did some experiments with our John
Deere robot and it the code „hybrid” — some part were in Python, which
talked over socket to notebook „powered by ROS”. While our
Python/OSGAR logs were quite small (we
recorded only CAN bus and TCP socket communication) the ROS Bag files were
huge! But if you want to look inside you need ROS tools … there must be
other way. So I decided to hack a simple Python script
rosbag.py
in order to see, what is exactly stored in these ROS Bags …
Where to start? I would recommend the
Bags/Format/2.0 documentation, link I mentioned in the introduction. You can
actually code it from it. Then you will need some specification of ROS
messages, but that will come later.
The format is relatively simple: it starts with string '#ROSBAG V2.0\n', in
particular notice the new line character '\n', which is easy to overlook :-(.
Read 13 bytes and assert.
Then there is an interlaced structure header, data, header, data, etc. Both
have 4bytes length prefix and then the content. Here I made „funny” mistake
(caused by that extra new line character). With 64bit Python you can read
really large blocks of data into memory. I have permanently open „hundreds”
of windows and tabs and my notebook memory is not so big. Sure enough there was
some „read 4GB” and it was deadly. 15minutes later it recovered (in system
call even Ctrl+C did not help), so I added safety line with MAX_RECORD_SIZE:
size = struct.unpack('>I', header_len)[0]
assert size > MAX_RECORD_SIZE, size
header = f.read(size)
The header is list of key=value pairs, where key is ASCII string
terminated by '=' and value is binary blob with size defined for the whole
pair. All headers must contain op code, which is one byte. As usual I added
assert for used op codes and to my surprise there were all of them except
the one I was looking for (0x2 Message data). The statistics for this 4.8GB
file looked like this:
      1 op 3
  12694 op 4
   1481 op 5
   1481 op 6
     81 op 7
i.e. one Bag header (0x3) at the beginning of the file, many Index data
(0x4), the same, smaller number of Chunk (0x5) and Chunk info (0x6) and
finally 81 Connection (0x7). But no Message data (0x2).
The trick is in Chunk which contains one or more messages, potentially from
different connections. The Chunk can be compressed by bz2, but in my
case it was not. Finally the Index data contains offsets to chunk data —
not confirmed but it looks like that at first you receive chunk and then
indexes. And that is it! There is maybe some shortcut via Chunk info
but I did not try that yet.
Once you understand the basic bag format you can focus on the content hidden in
Message data, which are hidden in Chunk as I mentioned above. From
Connection you can look up ID (conn) of particular topic you are
interested in. The list was long but some names were obvious:
- topic 1 b'/usb_cam/image_raw/compressed'
- topic 59 b'/usb_cam/image_raw'
so if they store uncompressed raw images, no wonder the log size is huge and
what is worse you stop recording it due to limited size of your hard drive,
sigh.
If you dump the data for /usb_cam/image_raw connection you will get similar
description to
type=sensor_msgs/Image.
Height, width, string description of encoding endians, step and data.
Unfortunately there is also Header which I did not download in time
(working offline now) and I am missing also the
include/sensor_msgs/image_encodings.h, so I had to guess.
After 7 attempts I got reasonably looking image . It took too long because I
was not sure about image width and height (yes, it should be in that header but
the image is not 5x4 for sure, i.e. I am looking at wrong number). At the end
it was easy: 3 channels, 16:9 ratio so 80 pixels per sub-square will give us
2764800 bytes.
The major part of the problem was I did not remember codes for PGM images. P3?
It was P4 for binary (PBM), P5 for gray scale (PGM) and P6 for RGB image (PPM).
Done.
And back to PuluTOF … it is time to look up some message types used for cloud
points and depth images. My next goal is to study
sensor_msgs/PointCloud2
Message used in another depth sensor NCS
3D sensing (Nippon Control System).
p.s. one more revision after downloading
std_msgs/Header
message specification. The string is in ROS coded as 4 bytes length + data
(i.e. it is not zero terminated C-string). Also if I know that I should
look for D0 2D 00 00 00 05 00 00 sequence it is much simpler
p.s.2 one more detail:
uint8[] data # actual matrix data, size is (step * rows)
this array is in ROS stored the same way as string, i.e. 4 bytes of length
and then data … now it finally matches the hacked version …
30th July 2018 — Easter egg on port 22222?
Today I was going through
PuluTOF1 source code and I
found out that it should be possible to switch into some verbose mode:
if(verbose_mode)
{
  fprintf(stderr, "Frame (sensor_idx= %d) read ok, pose=(%d,%d,%d). Timing data:\n",
          pulutof_ringbuf[pulutof_ringbuf_wr].sensor_idx,
          pulutof_ringbuf[pulutof_ringbuf_wr].robot_pos.x,
          pulutof_ringbuf[pulutof_ringbuf_wr].robot_pos.y,
          pulutof_ringbuf[pulutof_ringbuf_wr].robot_pos.ang);
  for(int i=0; i<24; i++)
  {
    fprintf(stderr, "%d:%.1f ", i,
            (float)pulutof_ringbuf[pulutof_ringbuf_wr].timestamps[i]/10.0);
  }
…
That could be quite useful, but there is no -v option on command line …
but you can switch it on interactively (via 'v'). And there are several more
interesting commands like 'x' for increasing and 'z' for decreasing index
similar to old computer games … but index for what?
if(tcp_client_sock >= 0)
{
  if(send_raw_tof >= 0 && send_raw_tof < 4)
  {
    tcp_send_picture(100, 2, 160, 60, (uint8_t*)p_tof->raw_depth);
    tcp_send_picture(101, 2, 160, 60, (uint8_t*)p_tof->ampl_images[send_raw_tof]);
  }
}
Now I see the answer why there is some TCP related code (files
tcp_comm.c
and
tcp_parser.c
with headers). By default the send_raw_tof is invalid (-1), but once you
connect on port 22222 and press 'x' it starts to dump measurement data for
sensor 0!
The nice part about it is that your listener does not have to be on the same
computer (i.e. Raspberry Pi) and you can directly use your favorite tools —
in my case OSGAR
logging library (yes, with some fixes — hopefully next time it would be
only
the
configuration).
And the result? This is output of logger.py if you change dump data to only
dump sizes of data with timestamps you will get:
0:00:00.152008 1 10000
0:00:00.152008 1 10000
0:00:00.153008 1 10000
0:00:00.153008 1 8420

0:00:00.618035 1 10000
0:00:00.618035 1 6060
0:00:00.618035 1 4380
0:00:00.618035 1 1460
0:00:00.618035 1 4380
0:00:00.619035 1 10000
0:00:00.619035 1 2140

0:00:01.089062 1 10000
0:00:01.089062 1 8980
0:00:01.089062 1 4380
0:00:01.089062 1 2920
0:00:01.089062 1 4380
0:00:01.089062 1 5840
0:00:01.089062 1 1920
i.e. 38420 bytes twice a second. Now it becomes useful to use what I did on
weekend:
>>> d = open('tmp.txt', 'rb').read()
>>> len(d)
816820
>>> img = d[10:10+2*9600]
>>> header = b'P5\n160 60 65536\n'
>>> with open('pulu.pgm', 'wb') as f:
…     f.write(header + img)
…
19216
and you will get pulu.pgm. There is maybe some trick how to convince Irfan
to open 16bit image (in millimeters) … at the moment I have only version
clipped to 8bit and it looks like this:
9th August 2018 — ROS installed
Yesterday I installed ROS. I reused my old virtual machine from times when we
played with Roborace. Note, that
your OS must match installed ROS version in order to avoid problems — see
List of ROS Distributions. At the moment
ROS Kinetic Kame running on Xenial is recommended.
The installation actually went mostly fine — see
Kinetic Installation Ubuntu
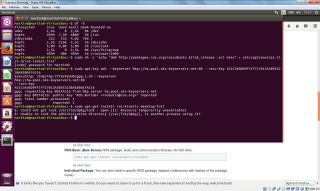
for instructions. There was one moment when sudo apt-get install
ros-kinetic-desktop-full failed due to used /var/lib/dpkg/lock, but
sudo dpkg --configure -a did the magic (?? not really sure what happened,
see
askubuntu).
It was probably foolish to install full package, but … rather to have
„everything ready”. It took approximately 2.3GB.
And now what? I was looking for some recommendations or animated hello
world which would ensure me that everything is ready but if I do not want to
start coding directly then there is no exciting warm welcome, as far as I can
tell. I looked at
ROS/Tutorial/Creating
a Simple Hardware Driver, which is on wiki.ros.org and sounds related,
but This tutorial is under construction and sure enough if you reach the
end you will see Next, wait for the rest of the tutorial to be written …
which could be a while as this last edit was back in 2011-03-06 23:01:55 by I
Heart Robotics. Maybe that is the reason I do not like ROS? It is huge, hard
to start and purely documented??
The next step was supposed to be logging of PuloTOF1 from Ubuntu virtual
machine, but for some unknown reason I do not see the sensor on the Ethernet
:(. It is probably time to take it home and see what is going on there on TV
(via HDMI cable, I hope).
p.s. update from home … for some reason TV does not show any image from
RasPi, although it detects HDMI input. But the good news is that I can see
tof007 on our router, i.e. Ethernet connection works fine.
